Belkin International, Inc., including all affiliates and subsidiaries (“Belkin”, “us” or “we”) thanks
you for choosing one of our Belkin, Linksys or Wemo products (the “Product”). This End-User
License Agreement (this “Agreement”) is a legal document that contains the terms and conditions
under which limited use of certain Software (as defined below) that operates with the Product is
licensed to you.
PLEASE READ THIS AGREEMENT CAREFULLY BEFORE INSTALLING OR USING THIS PRODUCT.
BY CHECKING THE BOX OR CLICKING THE BUTTON TO CONFIRM YOUR ACCEPTANCE WHEN YOU FIRST INSTALL THE
SOFTWARE, YOU ARE AGREEING TO ALL THE TERMS OF THIS AGREEMENT. ALSO, BY USING, COPYING OR
INSTALLING THE SOFTWARE, YOU ARE AGREEING TO ALL THE TERMS OF THIS AGREEMENT. IF YOU DO NOT
AGREE TO ALL OF THESE TERMS, DO NOT CHECK THE BOX OR CLICK THE BUTTON AND/OR DO NOT USE, COPY OR
INSTALL THE SOFTWARE, AND UNINSTALL THE SOFTWARE FROM ALL DEVICES THAT YOU OWN OR CONTROL. IF
YOU DO NOT ACCEPT THE TERMS OF THIS AGREEMENT AND YOU PURCHASED A PRODUCT CONTAINING THE
SOFTWARE FROM AN AUTHORIZED RETAILER, RESELLER OR APP STORE (AS DEFINED BELOW), YOU MAY BE
ELIGIBLE TO RETURN THE PRODUCT FOR A REFUND, SUBJECT TO THE TERMS AND CONDITIONS OF THE
APPLICABLE RETURN POLICY.
IF YOU ARE LOCATED IN THE UNITED STATES, THIS AGREEMENT CONTAINS A DISPUTE RESOLUTION AND BINDING
ARBITRATION PROVISION IN SECTION 17, INCLUDING A CLASS ACTION WAIVER THAT AFFECTS YOUR RIGHTS
WITH RESPECT TO DISPUTES YOU MAY HAVE WITH BELKIN. YOU MAY OPT OUT OF SUCH ARBITRATION AND CLASS
ACTION WAIVER AS PROVIDED IN SECTION 17.
This Software is licensed to you by Belkin and, where applicable, by Belkin’s suppliers. “Software”
means any and all firmware programs and associated files provided with respect to the Product;
any and all software programs, applications or “apps” and associated files provided with respect
to the Product; all modified versions of and upgrades or improvements to such programs (such as
those provided via web-based updates), all subsequent versions of such programs, and all copies
of such programs and files. Software does not include any Open Source Software (as defined
below).
By “you,” we mean the purchaser, recipient or other end user of the Product containing the Software
or the purchaser, recipient or other end user of the Software on a standalone basis. “You” may
also mean a person who has downloaded the Software from an authorized website, such as http://www.belkin.com or from an authorized
application market or store, such as Apple’s App Store or Google Play (each such application
market or store is referred to in this Agreement as an “App Store” and collectively as “App
Stores”).
1. LICENSE GRANT. Belkin hereby grants you the right to use: (i)
where your Product is not a “Small-Medium Business or SMB” branded Product, for your personal,
non-commercial purposes; or (ii) where your Product is a “Small Medium Business or SMB Product,
for your personal or commercial use; copies of the Software in object code form on devices that
you own (or, in the case of firmware, one copy of the firmware in object code form solely on the
Product relating to the firmware). As part of this license, you may (A) operate the Software in
the manner described in the user documentation for the Software; (B) where the Software is
provided for download onto a personal computer or mobile device, make as many copies of the
Software as you reasonably need for your own use (this does not include firmware); and (C)
permanently transfer all of your rights to use the Product (including but not limited to the
Software) to another person, so long as that person also agrees to be bound by this Agreement,
and following such transfer you stop using the Product and the Software.
You can find the user documentation for the Software on the “Support” page of the applicable Belkin
website.
2. LICENSE RESTRICTIONS. The Software is made available to you on
the basis of a limited license only as set out in this Agreement. You have the non-exclusive
right to use the Software in accordance with this Agreement. However, you may not (i) modify,
adapt or otherwise create derivative works from the Software, the Product containing the
Software or user documentation (except as may be permitted by an applicable open source
license); (ii) lease, sublicense, resell, rent, loan, redistribute, or otherwise transfer
(except as expressly permitted above), whether for commercial purposes or otherwise, the
Software or user documentation; (iii) reverse engineer, disassemble, decrypt or decompile the
Product or the Software or otherwise try to reduce the Software to a human-readable form, except
where and only to the extent that such activity is permitted by applicable law or where Belkin
is required to permit such activity under the terms of an applicable open source license; (iv)
remove or alter any copyright, trademark or other proprietary notices contained in the Software
or user documentation; (v) use the Product, Software or user documentation to develop a
competing hardware and/or software product, or otherwise in any manner not set forth in this
Agreement or the user documentation; (vi) if the Software is firmware, copy the firmware (other
than one backup copy for archival purposes only), use it on a multi-user system or operate it
separately from the Product onto which it is embedded; (vii) use the Software to transmit
software viruses or other harmful computer code, files or programs, or to circumvent, disable or
otherwise interfere with security-related features of the Software; (viii) use the Software to
collect or harvest any third party’s personally identifiable information, to send unauthorized
commercial communications or to invade the privacy rights of any third party; or (ix) use the
Software for any unlawful purpose, and/or in any manner that breaches this Agreement. All rights
not expressly granted to you by Belkin under this Agreement are hereby reserved by Belkin. You
will not acquire such rights, whether through estoppel, implication, or otherwise.
3. APP SOFTWARE RESTRICTIONS. If you have downloaded the Software
from an App Store, you are also subject to any terms of use of that App Store. Such terms of use
may prohibit you from doing some of the things you are permitted to do under this Agreement or
permit you to do some of the things you are prohibited from doing under this Agreement. In
addition, application of the App Store’s terms of use may result in other terms of this
Agreement not being applicable to the Software or applying in a different way than this
Agreement states. If your use of the Software is subject to an App Store’s terms of use, then in
the event of any conflict or ambiguity between the terms of this Agreement and such App Store’s
terms of use, the App Store’s terms of use will govern, but only to the extent necessary to
resolve such conflict or ambiguity, and the terms of this Agreement will otherwise remain in
full force and effect. Notwithstanding anything to the contrary in this Agreement, by using the
Software, you acknowledge and agree that it is solely your responsibility to understand the
terms of this Agreement, as well as the terms of use of any App Store that may be relevant to
the Software or the Product. If this Agreement relates to an App downloaded from Apple’s App
Store, the terms in the attached Apple Rider will also apply to you.
4. UPGRADES AND UPDATES. While Belkin is not required to do so,
Belkin may provide you with upgrades or updates to this Software. This Agreement will govern any
upgrades provided by Belkin that replace and/or supplement the original firmware and/or
Software, unless such upgrade is accompanied by a separate end user license agreement, in which
case the terms of that end user license agreement will govern. If you decide not to download
and/or to use an upgrade or update provided by Belkin, you understand that you could put the
Software at risk to serious security threats or cause the Software to become unusable or
unstable. Some Products include an auto-update feature, which gives us the ability to make
updates automatically. You can change auto-update options by changing your settings within the
Product account information. In very limited cases, updates may still be automatically applied,
regardless of the auto-update setting. For example, we may provide an automatic update that
fixes a security breach or vulnerability to your network. We may also provide you with updated
Software data files automatically to benefit you, such as to provide you with updated device
information to identify new devices in your network. These data files do not update your
firmware but consist of Software files that are cached on your Product and override older files.
By agreeing to this Agreement, you agree to automatic updates.
5. DATA AND PRIVACY. Belkin is committed to protecting your
privacy. Our goal is to provide you with a positive experience when using our apps, products and
services, while at the same time keeping your Personal Information, as defined in the Belkin
Privacy Policy (the “Privacy Policy”), secure. Our privacy practices are described in the
Privacy Policy, as well as in separate notices given when an app, product or service is
purchased or downloaded. At all times your information will be treated in accordance with the
Belkin Privacy Policy, which is incorporated by reference into this Agreement and can be viewed
here.
6. OPEN SOURCE SOFTWARE. You hereby acknowledge that the Software
may contain Open Source Software. This license does not apply to Open Source Software contained
in the Software. Rather, the terms and conditions in the applicable Open Source Software license
shall apply to the Open Source Software. Nothing in this Agreement limits your rights under, or
grants you rights that supersede, any Open Source Software license. You acknowledge that the
Open Source Software license is solely between you and the applicable licensor of the Open
Source Software. You shall comply with the terms of all applicable Open Source Software
licenses, if any. License and copyright information for the Open Source Software are disclosed
in the Product documentation, within the “Support” tab on Belkin websites and within the
“Contact Us” section on Linksys websites. Belkin is not obligated to provide any maintenance or
support for the Open Source Software or any Product Software that has been modified by you
pursuant to an Open Source Software license.
“Open Source Software” means any software or software component or technology that is subject to an
open source license. Open source licenses are generally licenses that make source code available
for free modification and distribution, but can also apply to technology received and
distributed solely in object code form. Examples of open source licenses include: (a) GNU's
General Public License (GPL) or Lesser/Library GPL (LGPL); (b) the OpenSSL License; (c) the
Mozilla Public License; (d) the Berkeley Software Distribution (BSD) License; and (e) the Apache
License.
7. INTELLECTUAL PROPERTY RIGHTS. All title and intellectual property
rights (including without limitation all copyrights, patents, trade secret rights and trademark
rights) in and to the Software (including but not limited to any content incorporated into the
Software), the accompanying printed materials, and any copies of the Software, are owned by
Belkin or its suppliers. Therefore, you must treat the Software like any other material
protected by laws and treaties relating to international property rights and in accordance with
this Agreement.
8. THIRD PARTY PRODUCTS AND SERVICES. The Software may contain links or
other features that make it easier for you to visit or log-in to independent third-party
websites (“Linked Sites”). These features are provided solely as a convenience to you. Linked
Sites are not under Belkin’s control, and Belkin is not responsible or liable for and does not
endorse the content or practices of such Linked Sites, including any information or materials
contained on such Linked Sites. You will need to make your own independent judgment regarding
your interaction with any Linked Sites. You hereby waive and release any legal claim you might
have against Belkin with respect to these sites or third-party products or services, and your
use of these sites, third-party products or services. We encourage you to read the terms and
conditions and privacy policy of each third party website that you choose to visit.
9. INDEMNITY. If Belkin is the subject of a claim, becomes
involved in a legal proceeding, or suffers any economic loss or damage as a result of your
violation of this Agreement, to the extent permitted by law, you will be responsible for
compensating Belkin for the full amount of its loss, as well as any reasonable amounts Belkin
incurs in lawyers' fees, expenses and court costs, except to the extent that Belkin contributed
to the loss or damage.
10. TERM. This Agreement is effective when you click on the “I
Accept” button, or when you in any other way use, copy or install the Software, which will
constitute your acceptance of, and agreement to, this Agreement. Once accepted, this Agreement
remains in effect until terminated. The limited license in this Agreement will automatically
terminate if you fail to comply with any of the terms and conditions in this Agreement. You
agree that upon such termination, you will immediately destroy all programs and documentation
that relate to the Software, including all copies made or obtained by you, and otherwise cease
use of the Software. If the Software has been installed on a personal computer or mobile device,
you must uninstall the Software immediately. If the Software is software or firmware embedded in
a Product, you must stop using the Product. All provisions of this Agreement except for Section
1 and the limited warranty in Section 12 (the first paragraph) will survive termination.
11. IMPORTANT NOTICE REGARDING YOUR CONSUMER RIGHTS.
NON-EU RESIDENTS. SOME COUNTRIES, STATES AND/OR PROVINCES DO NOT ALLOW THE
EXCLUSION OR LIMITATION OF CERTAIN CONDITIONS, WARRANTIES OR GUARANTEES, AND/OR DO NOT ALLOW
PRODUCTS OR SERVICES TO BE SOLD WITH NO WARRANTIES OR GUARANTEES. ACCORDINGLY, IF THESE LAWS
APPLY TO YOU, SOME OR ALL OF THE SECTIONS BELOW ENTITLED “LIMITED WARRANTY AND DISCLAIMER” AND
“GENERAL EXCLUSIONS AND LIMITATION OF LIABILITY” MAY NOT APPLY TO YOU. ONLY THOSE EXCLUSIONS AND
LIMITATIONS THAT ARE LAWFUL IN YOUR JURISDICTION WILL APPLY TO YOU AND, IN SUCH INSTANCES,
BELKIN’S LIABILITY WILL BE LIMITED ONLY TO THE MAXIMUM EXTENT PERMITTED BY LAW. THE
ENFORCEABILITY OF THESE LIMITED WARRANTIES MAY VARY BASED ON THE LOCAL LAWS APPLICABLE TO YOU,
AND YOU MAY HAVE ADDITIONAL RIGHTS DEPENDING ON WHERE YOU LIVE.
If you are located in Australia or New Zealand, the following four paragraphs apply to
you:
The benefits we give in this Agreement are additional to any rights and
remedies that you may have under the Australian Competition and Consumer Act 2010 or the New
Zealand Consumer Guarantees Act 1993 (“CGA”) (as applicable) and other applicable Australia and
New Zealand consumer protection laws.
In Australia, our Software and the media on which it is provided, as well as any related services,
come with guarantees that cannot be excluded under the Australian Consumer Law. For major
failures with the service, you are entitled:
- to cancel your service contract with us; and
- to a refund for the unused portion, or to compensation for its reduced value.
You are also entitled to be compensated for any other reasonably foreseeable loss or damage. If the
failure does not amount to a major failure, you are entitled to have problems with the Service
rectified in a reasonable time and, if this is not done, to cancel your contract and obtain a
refund for the unused portion of the contract.
In New Zealand, our Software and the media on which it is provided come with guarantees that cannot
be excluded under the Consumer Guarantees Act 1933 (NZ CGA).
This Agreement is not intended to and does not: (i) change or exclude any statutory consumer rights
that cannot be lawfully changed or excluded; or (ii) limit or exclude any right you have against
the person who sold the Product to you if that person has breached any sales contract with you.
You agree to use the Software in compliance with all applicable laws, including local laws of
the country or region in which you live or in which you download or use the Software.
EU RESIDENTS. Nothing in this Agreement is intended to or will have the
effect of limiting any of your rights under European Union law and/or the laws of your country
of residence, including rights as to the quality and fitness for purpose of the Software and its
compliance with the description of it which was made by us prior to you accepting this
Agreement.
References in this Agreement to “special, indirect, consequential, punitive or incidental damages”
shall mean any losses which (i) were not reasonably foreseeable by both parties; (ii) were known
to you but not to us; and/or (iii) were reasonably foreseeable by both parties but could have
been prevented by you such as, for example (but without limitation), losses caused by viruses,
malware or other malicious programs, or loss of or damage to your data.
You agree to use the Software in compliance with all applicable laws, including local laws of the
country or region in which you live or in which you download or use the Software.
12. LIMITED WARRANTY AND WARRANTY DISCLAIMER. Belkin warrants that
any media (such as a CD or USB stick) on which the Software may be provided will be free from
defects in materials and workmanship under normal use for 90 days from the date of its original
purchase (the “Warranty Period”). If you make an eligible software media claim under this
warranty during the Warranty Period (the “Limited Warranty”), Belkin will honor this warranty by
replacing the Software media. To make a claim under this Limited Warranty, return the defective
media along with the sales receipt directly to Belkin at the address indicated below, or you can
contact the Belkin Support Team in your area as indicated below. This Limited Warranty is void
if failure of the media has resulted from accident, abuse, or misapplication. Any replacement
media will be warranted for the remainder of the original Warranty Period or thirty (30) days,
whichever is longer. In relation to consumers who are entitled to the benefit of the CGA, the
media on which Software is provided comes with guarantees that cannot be excluded under New
Zealand law, and this Limited Warranty is in addition to any statutory rights such consumers may
have under New Zealand law. This Limited Warranty does not apply in Australia. Consumers in
Australia have statutory rights in relation to the Software and media on which the Software is
provided under the Australian Consumer Law.
EXCEPT FOR THIS LIMITED WARRANTY ON MEDIA, SUBJECT TO SECTION 11 AND TO THE MAXIMUM EXTENT PERMITTED
BY APPLICABLE LAW, THE SOFTWARE AND ANY RELATED PROGRAMS AND DOCUMENTATION IS PROVIDED TO YOU
“AS IS,” WITH ALL FAULTS AND WITHOUT WARRANTIES OF ANY KIND. IN THOSE JURISDICTIONS WHERE IT CAN
LAWFULLY DO SO, AND TO THE MAXIMUM EXTENT PERMITTED BY APPLICABLE LAW, BELKIN, ITS RESELLERS AND
ITS SUPPLIERS HEREBY DISCLAIM AND EXCLUDE ALL OTHER WARRANTIES, EXPRESS, STATUTORY OR IMPLIED,
INCLUDING BUT NOT LIMITED TO THE IMPLIED WARRANTIES OF MERCHANTABILITY, ACCEPTABLE OR
SATISFACTORY QUALITY, NON-INFRINGEMENT, TITLE, FITNESS FOR A PARTICULAR PURPOSE, LOSS OF OR
DAMAGE TO DATA, LACK OF VIRUSES OR FREE FROM VIRUS OR MALWARE ATTACK, SECURITY, PERFORMANCE,
LACK OF NEGLIGENCE, WORKMANLIKE EFFORT, QUIET ENJOYMENT, THAT THE FUNCTIONS CONTAINED IN THE
SOFTWARE WILL MEET YOUR REQUIREMENTS, OR THAT YOUR USE OF OR THE PERFORMANCE OF THE SOFTWARE AND
RELATED INFORMATION, PROGRAMS AND DOCUMENTATION WILL BE UNINTERRUPTED OR ERROR-FREE, OR THAT
DEFECTS IN THE SOFTWARE WILL BE CORRECTED, OR THAT YOUR USE OF THE SOFTWARE AND RELATED
INFORMATION, PROGRAMS AND DOCUMENTATION WILL GENERATE ACCURATE, RELIABLE, TIMELY RESULTS,
INFORMATION, MATERIAL OR DATA. NO ORAL OR WRITTEN INFORMATION OR ADVICE GIVEN BY BELKIN OR A
DEALER, AGENT OR AFFILIATE SHALL CREATE A WARRANTY. To the extent warranties cannot be
disclaimed or excluded, they are limited to the duration of the Warranty Period indicated above.
13. DISCLAIMERS, GENERAL EXCLUSIONS AND LIMITATION OF LIABILITY:
IN SOME JURISDICTIONS AND CIRCUMSTANCES, IT IS POSSIBLE TO EXCLUDE AND/OR TO LIMIT BELKIN’S LIABILITY
TO CONSUMERS. ONLY IN THOSE JURISDICTIONS WHERE IT CAN LAWFULLY DO SO, AND TO THE FULL EXTENT
THAT IT IS ALLOWED BY LOCAL CONSUMER LAWS IN YOUR COUNTRY (INCLUDING THE LAWS REFERRED TO IN
SECTION 11 ABOVE IF YOU ARE A CUSTOMER IN AUSTRALIA OR NEW ZEALAND), BELKIN:
- EXCLUDES ALL LIABILITY FOR THE LOSS OF, OR DAMAGE TO, DATA CAUSED BY USE OF THE
SOFTWARE;
- EXCLUDES ANY LIABILITY IT MAY HAVE TO YOU FOR:
- LOSS OF REVENUE OR PROFIT,
- LOSS OF THE ABILITY TO USE ANY THIRD-PARTY PRODUCTS, SOFTWARE OR
SERVICES, AND
- ANY INDIRECT, CONSEQUENTIAL, SPECIAL, EXEMPLARY, INCIDENTAL OR
PUNITIVE LOSS OR DAMAGES (INCLUDING BUT NOT LIMITED TO DAMAGES
FOR LOSS OF USE, DATA, BUSINESS INTERRUPTION OR COST OF
PROCURING SUBSTITUTE SERVICES), WHICH ARISES UNDER ANY LAW
(INCLUDING THE LAW OF NEGLIGENCE) AND WHICH RELATES TO YOUR USE
OF, OR INABILITY TO USE, THE SOFTWARE OR ANY RELATED SERVICES.
THIS EXCLUSION APPLIES EVEN IF BELKIN HAS BEEN ADVISED OF THE
POSSIBILITY OF SUCH DAMAGES AND EVEN IF ANY WARRANTY OR REMEDY
PROVIDED UNDER THE ABOVE WARRANTY FAILS OF ITS ESSENTIAL
PURPOSE; AND
- LIMITS ITS MONETARY LIABILITY TO YOU, UNDER ANY LAW, TO FIFTY DOLLARS ($50.00).
THIS LIMITATION IS CUMULATIVE AND WILL NOT BE INCREASED BY THE EXISTENCE OF MORE THAN ONE INCIDENT OR
CLAIM. NOTHING IN THIS SECTION SHALL LIMIT BELKIN’S LIABILITY IN RELATION TO DEATH OR BODILY
INJURIES RESULTING FROM THE NEGLIGENCE OR RECKLESSNESS OF BELKIN AND/OR ITS ASSOCIATED PARTIES.
YOUR USE OF THE SOFTWARE, PRODUCT AND RELATED PROGRAMS AND DOCUMENTATION IS AT YOUR OWN RISK AND
DISCRETION. YOU ARE SOLELY RESPONSIBLE FOR (AND BELKIN DISCLAIMS) ANY AND ALL LOSS, LIABILITY,
OR DAMAGES, INCLUDING TO YOUR HOME, HVAC SYSTEM, ELECTRICAL SYSTEM, PLUMBING, PRODUCT, OTHER
PERIPHERALS CONNECTED TO THE PRODUCT, COMPUTER, MOBILE DEVICE, AND ALL OTHER ITEMS AND PETS IN
YOUR HOME, RESULTING FROM YOUR MISUSE OF THE SOFTWARE, PRODUCT AND RELATED PROGRAMS AND
DOCUMENTATION. YOU ARE RESPONSIBLE FOR COMPLYING WITH ANY SAFETY WARNINGS AND PRECAUTIONS THAT
ACCOMPANY THE PRODUCT. IF YOU ARE NOT COMFORTABLE WITH USING THE PRODUCT AFTER READING THE
SAFETY WARNINGS, YOU MUST RETURN THE PRODUCT TO YOUR PLACE OF PURCHASE AND STOP USING THE
SOFTWARE. BELKIN IS NOT RESPONSIBLE FOR (I) YOUR FAILURE TO FOLLOW SAFETY WARNINGS, PRECAUTIONS
OR ANY OTHER INSTRUCTIONS PROVIDED WITH THE PRODUCT AND/OR SOFTWARE, (II) YOUR NEGLIGENCE IN USE
OF THE PRODUCT AND/OR SOFTWARE, OR (III) YOUR INTENTIONAL MISUSE OF THE PRODUCT OR SOFTWARE.
YOU FURTHER ACKNOWLEDGE THAT THE SOFTWARE AND ANY RELATED PROGRAMS AND DOCUMENTATION ARE NOT
CERTIFIED FOR EMERGENCY RESPONSE OR INTENDED OR SUITABLE FOR USE IN SITUATIONS OR ENVIRONMENTS
WHERE FAILURE, DELAY OR ERRORS OR INACCURACIES IN THE DATA OR INFORMATION PROVIDED BY THE
SOFTWARE COULD LEAD TO DEATH, PERSONAL INJURY OR SEVERE PHYSICAL OR ENVIRONMENTAL DAMAGE,
INCLUDING WITHOUT LIMITATION IN CONNECTION WITH THE OPERATION OF NUCLEAR FACILITIES, AIRCRAFT
NAVIGATION OR COMMUNICATION SYSTEMS, AIR TRAFFIC CONTROL, LIFE SUPPORT OR WEAPONS SYSTEMS. YOU
UNDERSTAND THAT THE PRODUCT AND SOFTWARE ARE NOT PART OF AND DO NOT CONTAIN A THIRD-PARTY
MONITORED EMERGENCY NOTIFICATION SYSTEM. BELKIN DOES NOT MONITOR EMERGENCY NOTIFICATIONS AND
WILL NOT DISPATCH EMERGENCY AUTHORITIES TO YOUR HOME IN THE EVENT OF AN EMERGENCY. BELKIN
CUSTOMER SUPPORT CONTACTS CANNOT BE CONSIDERED A LIFESAVING SOLUTION AND THEY ARE NOT A
SUBSTITUTE FOR EMERGENCY SERVICES. ALL LIFE THREATENING AND EMERGENCY SITUATIONS SHOULD BE
DIRECTED TO THE APPROPRIATE EMERGENCY RESPONSE SERVICES IN YOUR AREA.
It is your responsibility to back up your system, including without limitation, any material,
information or data that you may use or possess in connection with the Product or Software, and
Belkin shall have no liability for your failure to back up your system or any material,
information or data.
Some Belkin Products and Software may monitor energy consumption in the home. Belkin does not
guarantee or promise any specific level of energy savings or other monetary benefit from the use
of the Products or Software or any other feature. Actual energy savings and any associated
monetary benefits vary based on factors beyond Belkin’s control or knowledge. From time to time,
Belkin may use the Software to provide you with information that is unique to you and your
energy usage and suggests an opportunity to save money on energy bills if you adopt suggestions
or features of the Product or Software. You acknowledge that this information is not a guarantee
of actual savings, and you agree not to seek monetary or other remedies from Belkin if your
savings differs. All information provided to you by Belkin is provided “as is” and “as
available”. We cannot guarantee that it is correct or up to date. In cases where it is critical,
accessing information through the Software is not a substitute for direct access of the
information in the home.
The warranties and remedies set out in this Agreement are exclusive, and, to the extent permitted by
law, in lieu of all others oral or written, express or implied.
14. EXPORT CONTROL LAWS: You agree that the use of the Software is
subject to U.S. and local export control laws and regulations. You represent and warrant that
you are not located in or a citizen of an embargoed or “terrorist supporting” country or a
prohibited or restricted end user under applicable U.S. or local export and anti-terrorism laws,
regulations and lists. You agree to strictly comply with all export control laws and regulations
and agree not to export, re-export, divert, transfer or disclose any portion of the Software or
any related technical information or materials, directly or indirectly, in violation of any
applicable export law or regulation.
15. U.S. GOVERNMENT USERS: The Software and user documentation
qualify as “commercial items” as defined at 48 C.F.R. 2.101 and 48 C.F.R. 12.212. All U.S.
Government users acquire the Software and user documentation with only those rights herein that
apply to non-governmental customers. Use of either the Software or user documentation or both
constitutes agreement by the U.S. Government that the Software and user documentation are
“commercial computer software” and “commercial computer software documentation,” and constitutes
acceptance of the rights and restrictions herein.
16. GENERAL TERMS. If any portion of this Agreement or any of its
terms is found to be void or unenforceable by law in a particular jurisdiction, such portion or
terms shall be interpreted and enforced to the maximum extent allowed in such jurisdiction, and
the remaining provisions or any part thereof will remain in full force and effect. This
Agreement constitutes the entire agreement between Belkin and you with respect to the Software
and your use thereof and supersedes any conflicting or additional terms contained in any
purchase order or elsewhere. No provision of this Agreement may be waived, modified or
superseded except by a written instrument signed and accepted by Belkin and you. However, the
Belkin Privacy Policy referenced herein is subject to change in the manner described in that
document. Belkin may provide translations of this Agreement as a convenience to users. However,
in the event of a conflict or inconsistency between the English and any non-English versions,
the English version of this Agreement shall govern, to the extent not prohibited by local law in
your jurisdiction. Any suppliers of Belkin shall be direct and intended third-party
beneficiaries of this Agreement, including without limitation with respect to the disclaimers of
warranties and limitations on liability set forth herein. Other than as set forth in the
preceding sentence, a person or entity who is not a party to this Agreement shall not have any
right to enforce any term of this Agreement. No failure or delay in exercising any right or
remedy shall operate as a waiver of any such (or any other) right or remedy. The language of
this Agreement shall not be construed strictly for or against either party, regardless of who
drafted such language or was principally responsible for drafting it. The rights and obligations
under this Agreement are not assignable by you, and any attempted assignment shall be void and
without effect. This Agreement shall bind and inure to the benefit of the parties and their
successors and permitted assigns. In the event of any legal proceeding between the parties
arising out of or related to this Agreement, the prevailing party shall be entitled to recover,
in addition to any other relief awarded or granted, its costs and expenses (including reasonable
attorneys’ and expert witness’ fees) incurred in any such proceeding.
If you are located in the United States, Section 17 applies to you:
17. ARBITRATION, WAIVER OF CLASSWIDE ARBITRATION, GOVERNING LAW &
VENUE.
MANDATORY ARBITRATION. You have the right to opt-out of this mandatory
arbitration provision. If you opt-out, you will retain your right to file a lawsuit. To opt-out,
you must follow the directions set forth below under the heading “How to Opt Out of Mandatory
Arbitration”. If you do not opt-out, you will have agreed to the mandatory arbitration set forth
below.
PLEASE READ CAREFULLY. THE FOLLOWING PROVISIONS AFFECT YOUR RIGHTS.
YOU AND BELKIN EACH ACKNOWLEDGE AND AGREE THAT ANY CLAIM, DISPUTE OR CONTROVERSY BETWEEN YOU AND
BELKIN ARISING OUT OF OR RELATING TO (1) THIS AGREEMENT, INCLUDING THE VALIDITY OF THIS SECTION,
AND (2) YOUR USE OF SOFTWARE AND/OR PRODUCT(S) UNDER THIS AGREEMENT (COLLECTIVELY, THE
“DISPUTE”) SHALL BE RESOLVED EXCLUSIVELY AND FINALLY BY BINDING ARBITRATION ADMINISTERED BY A
MUTUALLY AGREEABLE NATIONALLY RECOGNIZED ARBITRATION AUTHORITY PURSUANT TO ITS CODE OF
PROCEDURES THEN IN EFFECT FOR CONSUMER-RELATED DISPUTES. YOU UNDERSTAND THAT WITHOUT THIS
PROVISION YOU WOULD HAVE HAD A RIGHT TO LITIGATE A DISPUTE THROUGH A COURT BEFORE A JURY OR
JUDGE, AND THAT YOU HAVE EXPRESSLY AND KNOWINGLY WAIVED THOSE RIGHTS AND AGREE INSTEAD TO
RESOLVE ANY DISPUTES THROUGH BINDING ARBITRATION IN ACCORDANCE WITH THE PROVISIONS OF THIS
SECTION.
ARBITRATION PROCEDURES AND FEES. THE ARBITRATION SHALL OCCUR BEFORE A SINGLE
ARBITRATOR, WHO MUST BE A RETIRED JUDGE OR JUSTICE, IN ONE OF SIX REGIONAL VENUES CONSISTENT
WITH THE VENUE PROVISION BELOW. WHETHER OR NOT YOU PREVAIL IN THE DISPUTE SO LONG AS YOUR CLAIM
IS NOT FOUND TO BE FRIVOLOUS BY THE ARBITRATOR AS MEASURED BY RULE 11(b) OF THE FEDERAL RULES OF
CIVIL PROCEDURE, YOU SHALL BE ENTITLED TO BE REIMBURSED FOR YOUR COSTS OF ARBITRATION, WITHIN
THE SOLE DISCRETION OF THE ARBITRATOR. IF THE ARBITRATION AWARD IS EQUAL TO OR GREATER THAN THE
AMOUNT YOU DEMANDED IN YOUR ARBITRATION CLAIM, BELKIN WILL PAY FOR YOUR REASONABLE AND ACTUAL
ATTORNEYS’ FEES YOU HAVE INCURRED TO ARBITRATE THE DISPUTE, PLUS A MINIMUM RECOVERY OF $2,500.
ANY DECISION OR AWARD BY THE ARBITRATOR RENDERED IN AN ARBITRATION PROCEEDING SHALL BE FINAL AND
BINDING ON EACH PARTY, AND MAY BE ENTERED AS A JUDGMENT IN ANY COURT OF COMPETENT JURISDICTION.
IF EITHER PARTY BRINGS A DISPUTE IN A COURT OR OTHER NON-ARBITRATION FORUM, THE ARBITRATOR OR
JUDGE MAY AWARD THE OTHER PARTY ITS REASONABLE COSTS AND EXPENSES (INCLUDING BUT NOT LIMITED TO
ATTORNEYS’ FEES) INCURRED IN ENFORCING COMPLIANCE WITH THIS BINDING ARBITRATION PROVISION,
INCLUDING STAYING OR DISMISSING SUCH DISPUTE.
WAIVER OF CLASSWIDE CLAIMS; SMALL CLAIMS COURT. NEITHER YOU NOR BELKIN SHALL
BE ENTITLED TO JOIN OR CONSOLIDATE CLAIMS IN ARBITRATION BY OR AGAINST OTHER CONSUMERS OR
ARBITRATE ANY CLAIMS AS A REPRESENTATIVE OR MEMBER OF A CLASS OR IN A PRIVATE ATTORNEY GENERAL
CAPACITY. YOU UNDERSTAND THAT WITHOUT THIS PROVISION YOU MAY HAVE HAD A RIGHT TO ARBITRATE A
DISPUTE ON A CLASSWIDE OR REPRESENTATIVE BASIS, AND THAT YOU HAVE EXPRESSLY AND KNOWINGLY WAIVED
THOSE RIGHTS AND AGREE INSTEAD TO ARBITRATE ONLY YOUR OWN DISPUTE(S) IN ACCORDANCE WITH THE
PROVISIONS OF THIS SECTION.
NOTWITHSTANDING THE ABOVE AGREEMENT TO ARBITRATE DISPUTES, YOU AND BELKIN EACH ACKNOWLEDGE AND AGREE
THAT EITHER PARTY MAY, AS AN ALTERNATIVE TO ARBITRATION, BRING AN INDIVIDUAL ACTION IN SMALL
CLAIMS COURT TO RESOLVE A DISPUTE, SO LONG AS SUCH SMALL CLAIMS COURT DOES NOT PROVIDE FOR OR
ALLOW FOR JOINDER OR CONSOLIDATION OF CLAIMS.
GOVERNING LAW. THIS AGREEMENT IS TO BE CONSTRUED IN ACCORDANCE WITH AND
GOVERNED BY THE INTERNAL LAWS OF THE STATE OF CALIFORNIA WITHOUT GIVING EFFECT TO ANY CHOICE OF
LAW RULE THAT WOULD CAUSE THE APPLICATION OF THE LAWS OF ANY JURISDICTION (OTHER THAN THE
INTERNAL LAWS OF THE STATE OF CALIFORNIA) TO THE RIGHTS AND DUTIES OF THE PARTIES. HOWEVER, WITH
RESPECT TO SOFTWARE PROVIDED, IF YOU ARE A CONSUMER AND YOU LIVE IN A COUNTRY WHERE BELKIN
MARKETS OR PROMOTES THE SOFTWARE, LOCAL LAW MAY REQUIRE THAT CERTAIN CONSUMER PROTECTION LAWS OF
YOUR COUNTRY OF RESIDENCE APPLY TO SOME SECTIONS OF THIS AGREEMENT. EACH OF THE UNITED NATIONS
CONVENTION ON CONTRACTS FOR THE INTERNATIONAL SALE OF GOODS AND THE UNITED NATIONS CONVENTION ON
THE LIMITATION PERIOD IN THE INTERNATIONAL SALE OF GOODS IS HEREBY EXPRESSLY EXCLUDED AND WILL
NOT APPLY TO THIS AGREEMENT.
VENUE. EXCEPT FOR INDIVIDUAL SMALL CLAIMS ACTIONS WHICH CAN BE BROUGHT IN ANY
SMALL CLAIMS COURT WHERE JURISDICTION AND VENUE ARE PROPER, ANY ARBITRATION, LEGAL SUIT, ACTION
OR PROCEEDING ARISING OUT OF OR RELATING TO THIS AGREEMENT OR ANY DISPUTE SHALL BE COMMENCED IN
(1) NEW YORK, NEW YORK, (2) ATLANTA, GEORGIA, (3) CHICAGO, ILLINOIS, (4) DALLAS, TEXAS, (5)
SEATTLE, WASHINGTON, OR (6) LOS ANGELES, CALIFORNIA, AND YOU AND BELKIN EACH IRREVOCABLY SUBMITS
TO THE EXCLUSIVE JURISDICTION AND VENUE FOR ANY SUCH PROCEEDING. HOWEVER, FOR A DISPUTE OF
$2,500 OR LESS, YOU MAY CHOOSE WHETHER THE ARBITRATION IN ANY OF THE SIX REGIONAL VENUES
PROCEEDS IN PERSON, BY TELEPHONE, OR BASED ONLY ON SUBMISSIONS.
HOW TO OPT OUT OF MANDATORY ARBITRATION. Notwithstanding the foregoing, you or
Belkin may file a lawsuit in court rather than resolving the Dispute by arbitration if (a) the
Dispute qualifies for small claims court (there are monetary limitations for small claims
court), or (b) you opt out of these arbitration procedures within 30 days from the date
that you accept this Agreement (the “Opt-Out Deadline”). In order to opt out of
mandatory arbitration, you must (i) mail written notification to Belkin International, Inc.,
12045 E. Waterfront Drive, Playa Vista, California, 90094, Attn: Chief Legal Officer, or (ii)
email written notification to arbitrationoptout@belkin.com. In either
case, such written notification must include your name, address, and a clear statement that you
do not wish to resolve disputes with Belkin through arbitration. Any opt-out request received
after the Opt-Out Deadline will not be valid and you must pursue your Dispute in arbitration or,
if the dispute qualifies, in small claims court.
If you are located outside of the United States, or if Section 17 does not apply to you
or is otherwise unenforceable as adjudicated by a court of competent
jurisdiction, then Section 18 applies to you:
18. GOVERNING LAW.
NON-EU RESIDENTS. The courts in some countries or jurisdictions will not
apply California law to some types of disputes. If you are resident in one of those countries or
jurisdictions, then where California law is excluded from applying, your country’s laws will
apply to such disputes which are related to this Agreement. In all other circumstances, this
Agreement will be governed by California law, without reference to its or any other
jurisdiction’s conflict of laws principles. The courts in some countries or jurisdictions will
not allow for dispute resolution by arbitration or waiver of classwide claims by you. If you are
a resident of one of those countries or jurisdictions, any action arising out of or relating to
this Agreement may be brought exclusively in the appropriate state or federal court in Los
Angeles, California, and Belkin and you irrevocably consent to the jurisdiction of such courts
and venue in Los Angeles, California. However, if you are a consumer and you live in a country
where Belkin markets or distributes the Software, local law may require that certain consumer
protection laws of your country of residence apply to some sections of this Agreement. In
addition, Belkin may seek injunctive relief in any court having jurisdiction to protect its
intellectual property rights. Each of the United Nations Convention on Contracts for the
International Sale of Goods and the United Nations Convention on the Limitation Period in the
International Sale of Goods is hereby expressly excluded and will not apply to this Agreement.
EU RESIDENTS. If you are a natural person who resides in a country in the
European Union, the laws of the member state in which you are a resident shall apply to this
Agreement and any disputes potentially arising in connection thereto. The courts of the member
state in which you reside shall have non-exclusive jurisdiction over any such dispute. Residents
of countries in the European Union may also bring any such dispute before a local consumer
dispute resolution body, if any such body is constituted under the laws of the country in which
you reside. Otherwise if you are located in Europe and are not a natural person, the laws of the
United Kingdom shall apply to all matters arising from or relating to this Agreement (without
reference to its choice of law provisions) and all disputes related thereto are dealt
exclusively by the competent courts of the United Kingdom.
APPLE RIDER
(REQUIRED FOR APP SOFTWARE ON APPLE’S APP STORE ONLY)
Acknowledgement. Both Belkin and you acknowledge that (i) this Agreement is
concluded between Belkin and you only, and not with Apple, Inc. (“Apple”); (ii) as between
Belkin and Apple, Belkin, not Apple, is solely responsible for the licensed application (“App”)
and the content thereof. This Agreement does not provide for usage rules for the App that
conflicts with the App Store Terms of Service as of the date you entered into this Agreement,
and you acknowledge that you have had the opportunity to review the App Store Terms of Service.
Scope of License: The license granted to you for the App is limited to a
non-transferable license to use the App on any Apple-branded products that you own or control
and as permitted by the Usage Rules set forth in the App Store Terms of Service, except that
such App may be accessed, acquired and used by other accounts associated with you via family
sharing or volume purchasing.
Maintenance and Support. Belkin is solely responsible for providing any maintenance
and support services with respect to the App as required under applicable law. Both Belkin and
you acknowledge that Apple has no obligation whatsoever to furnish any maintenance and support
services with respect to the App.
Warranty: Belkin is solely responsible for the warranty in this Agreement, whether
express or implied by law, to the extent not effectively disclaimed. In the event of any failure
of the App to conform to any applicable warranty, you may notify Apple, and Apple will refund
the purchase price for the App to you. To the maximum extent permitted by applicable law, Apple
will have no other warranty obligation whatsoever with respect to the App, and any other claims,
losses, liabilities, damages, costs or expenses attributable to any failure to conform to any
warranty will be Belkin’s sole responsibility.
Product Claims. Belkin and you acknowledge that Belkin, and not Apple, is
responsible for addressing any claims relating to the App and your possession and/or use of the
App, including but not limited to: (i) product liability claims; (ii) any claim that the App
fails to conform to any applicable legal or regulatory requirement; and (iii) claims arising
under consumer protection or similar legislation. This Agreement does not limit Belkin’s
liability beyond what is permitted by applicable law.
Intellectual Property Rights. Belkin and you acknowledge that in the event of any
third party claim that the App or your possession and use of the App infringes that third
party’s intellectual property rights, Belkin and not Apple will be solely responsible for the
investigation, defense, settlement and discharge of any such intellectual property infringement
claim.
Third Party Terms of Agreement. You must comply with any applicable third-party
terms of agreement when using the App, such as your wireless data service agreement.
Third Party Beneficiary. Belkin and you acknowledge and agree that Apple and its
subsidiaries are third party beneficiaries of this Agreement and that, upon your acceptance of
the terms and conditions of this Agreement, Apple will have the right (and will be deemed to
have accepted the right) to enforce this Agreement against you as a third party beneficiary.
********************************
Belkin International, Inc.
12045 East Waterfront Drive
Playa Vista, California 90094
If you have a question about your Product or Software or experience a problem with it, please go to
the following websites for information on how to contact Belkin in your area:
Belkin, Linksys, Wemo and many product names and logos are trademarks of the Belkin group of
companies. Third-party trademarks mentioned are the property of their respective owners.
© 2019 Belkin International, Inc. and/or its affiliates. All rights reserved.
Dated June 2019
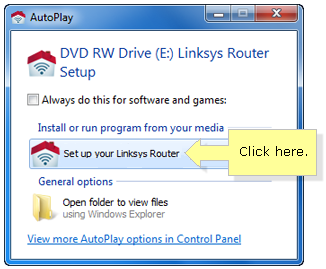
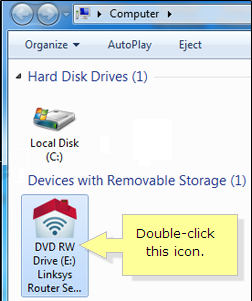
![]() icon on your Desktop. Look for this
icon on your Desktop. Look for this ![]() icon then double-click it. This should immediately start the setup process.
icon then double-click it. This should immediately start the setup process.